Hi,
This belt looks simple but it took quite a good amount of time, may be because i don't have the proper tools. But the output was really impressing. I used quilling paper, dress hook, flexible metal wire, glue and cutting plier.


This belt looks simple but it took quite a good amount of time, may be because i don't have the proper tools. But the output was really impressing. I used quilling paper, dress hook, flexible metal wire, glue and cutting plier.


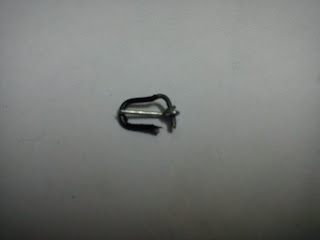
I took a hook that fits the size of quilling paper and cut off one eye and opened the other eye and made it straight and cut off the extra wire as in above pic.

I took a flexible metal wire and wound it around as in pic above. Click to enlarge.
I folded the quilling paper twice and glued it, to get the thickness. Now take the required length of paper . To fit the buckle at one side, measure 1.5cm and fold it at center. Make small hole for the buckle pin to pass. Now insert the paper into the loop with the buckle pin passing through the hole. See a real belt for reference if needed. Now glue the folded paper and let it dry.

Now make holes leaving the waist measurement . Belt is ready to be worn by your doll.

You can give it a leather look by polishing the belt with dark tan shoe polish like below

Have a nice day :-)
P.S: I did a mistake in making buckle. I didn't scrap off the paint from it, that's why its looking a little odd. You guys don't neglect this. Scrap paint before the procedure and apply the paint of your choice for buckle after the completion, because while bending the color peels off. So paint it after finishing the belt.
Gracias por el tutorial. Es fantástico!!! Un beso
ReplyDeleteVery ingenious! I think, though,a simpler method would be to simply cut a strip to size of Ultrasuede, leather-look vinyl or fold and fuse fabric strips to size and length. It wouldn't be necessary to cut the eye hooks off...just wire the peg to the eyes with beading wire--24 or 26 gauge should work. Use a ready made eyepin, or make your own and flatten one end a tad, then wrap the eyes with the wire to make the crosspiece, either going from eye to eye, or from eye to eyepin loop on each side. I'm going to try this with some of my heavier gauge wires and see what happens making the buckle too!
ReplyDeleteSimple yet brilliant. I've been scratching my head where to get tiny buckles (for cheap - is the word). Was just about to toss out old brasiers. Taking the hooks out first. Thank you for this tutorial. And that comment by anonymous helped too. Sometimes you are just sitting on the solution without noticing it.
ReplyDelete